How to Create a Facebook Business Page in 2025
A Facebook Business Page is essential for any business, organization, or public figure seeking to connect with a vast and diverse audience, build lasting customer loyalty, and drive significant growth. Boasting over three billion monthly active users worldwide, spanning diverse age groups from Gen Z to Baby Boomers, Facebook provides an unparalleled platform to reach potential customers, share important updates, and cultivate a thriving community around your brand. Creating a well-crafted Facebook Business Page is a key step to enhance your visibility and engagement in 2025, whether you are just starting out or are already established and looking to expand your reach across a wide demographic.
TL;DR
This guide covers setting up your profile, entering business info (name, category, bio, contact), adding visuals (profile & cover photos), using an action button, connecting WhatsApp, inviting friends, managing notifications, posting engaging content, adding team members, and how to deactivate/delete with a reminder to backup your page. Perfect for businesses looking to establish an online presence in 2025.
Benefits of having a Facebook Business Page
- Enhanced Visibility: Reach a massive audience and increase brand awareness.
- Direct Customer Engagement: Interact with customers, answer queries, and build relationships.
- Targeted Advertising: Utilize Facebook's powerful advertising tools to reach specific demographics.
- Valuable Insights: Gain access to analytics to understand audience behavior and optimize your strategy.
- Showcase Products and Services: Display your offerings and attract potential buyers.
- Build Community: Create a space for loyal customers to connect with your brand and each other.
- Credibility and Professionalism: Establish a professional online presence and build trust.
Let's dive into the step-by-step process of creating a Facebook Business Page that stands out in 2025.
Step 1: Setting Up Your Facebook Profile
Before creating a Business Page, it's important to understand the distinction between Facebook profiles and pages.
- Facebook Profile: Represents an individual person and is used for personal connections, sharing personal updates, and interacting with friends and family.
- Facebook Page: Represents a business, brand, organization, or public figure. It's designed for public communication, marketing, and community building.
Importance of logging into a personal Facebook profile
To create a Facebook Business Page, you need to log in to your personal Facebook profile. This is a necessary step for administrative purposes. Facebook requires a personal profile to manage a Business Page, ensuring accountability and security.
Assurances about privacy of personal account information
Rest assured, your personal profile information will not be publicly visible on your Business Page. Facebook keeps your personal and business presences separate. Your friends and personal connections will not automatically see or be linked to your Business Page unless you choose to invite them. Your personal profile is used solely for managing the page behind the scenes.
Step 2: Entering Your Business Information
Now, let's begin creating your Business Page.
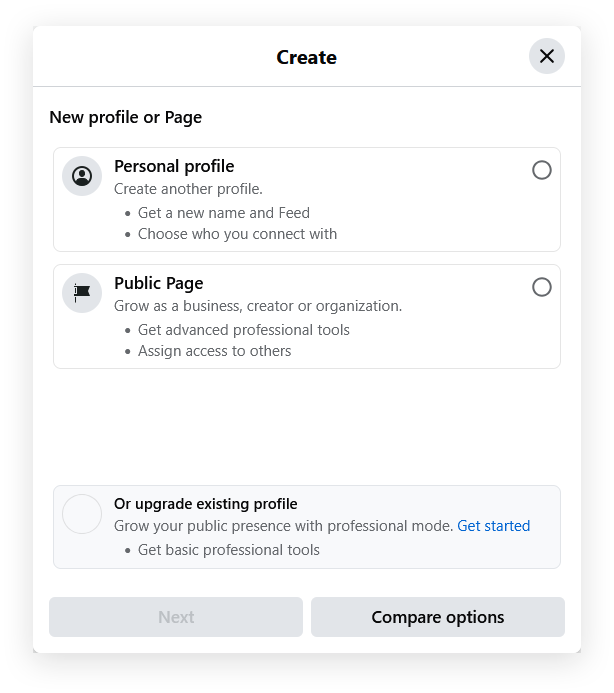
Start the Page Creation Process
Once logged into your personal Facebook profile, look for the "Pages" section on the left-hand menu. Click on "Pages" and then select "Create New Page".
Choose a Page Name
This is a crucial step. Your Page name should clearly represent your business and be easy for people to find and remember.
Tips for choosing a page name
- Use your business name: If possible, use your official business name. This helps customers easily find you.
- Keep it concise and memorable: Avoid overly long or complex names.
- Consider SEO: Include relevant keywords if appropriate and naturally fitting. For example, "[Your Business Name] - Digital Marketing Agency" if you are a digital marketing agency.
- Check for availability: Ensure the name isn't already in use by another business, especially in your niche.
Select a Category
Choose a category that accurately describes your business. Facebook provides a dropdown menu with various categories and subcategories.
Tips for choosing a category
- Be specific: Select the most relevant category and subcategory to help Facebook understand and categorize your page correctly. This improves discoverability.
- Browse available options: Explore the dropdown menu to find the best fit. You can choose up to three categories.
- Example: If you own a coffee shop, categories could be "Restaurant," "Coffee Shop," and "Cafe."
Write a Compelling Bio
The "Bio" or "Description" section is your elevator pitch. It appears under your Page name and category and is often the first text visitors see.
Importance of completing the Bio section
- Credibility: A well-written bio instantly adds credibility and tells visitors what your page is about.
- SEO (Search Engine Optimization): Facebook uses the bio to understand your page's content, which helps in search rankings within Facebook and potentially on external search engines.
- Clarity: It quickly informs potential followers about your business, its mission, and what value you offer.
Tips for writing a bio
- Be concise: Aim for a short, impactful description (usually within 100-155 characters).
- Highlight key offerings: Briefly mention your main products, services, or mission.
- Use relevant keywords: Incorporate keywords related to your industry or niche to improve searchability.
- Include a call to action (optional): You can subtly encourage visitors to learn more or take the next step, e.g., "Visit our website to explore our services."
- Example: For a bakery: "Artisan bakery in Bratislava specializing in sourdough bread and custom cakes. Order online or visit us today!"
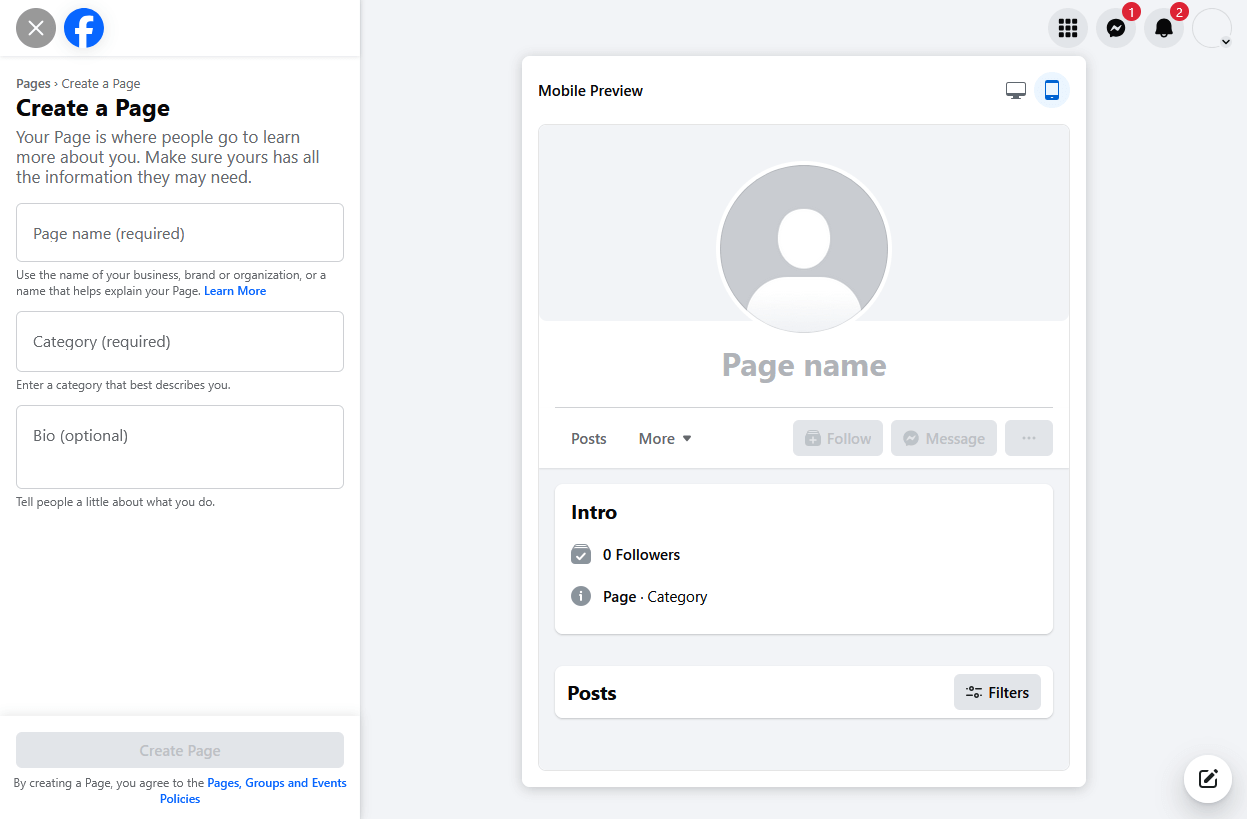
Click "Create Page"
After filling in the Page name, category, and bio, click the "Create Page" button. Facebook will then generate your basic Business Page structure.
Step 3: Adding Contact Details
Providing comprehensive contact information is essential for customer connection and trust.
Access the Page Details Section
On your newly created Page, navigate to the left-hand menu and find Page Details (or similar, depending on Facebook's layout updates).
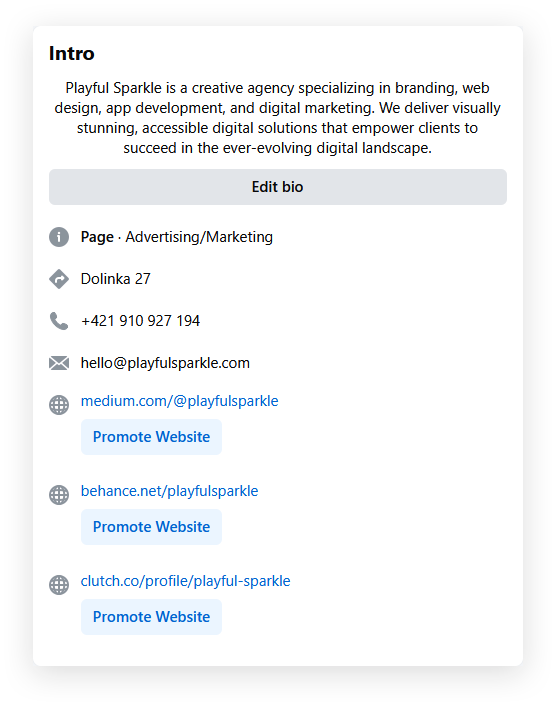
Enter Contact Information
- Phone Number: Add your business phone number. This allows customers to easily contact you directly.
- Website: Include your website URL. This is crucial for driving traffic to your main online presence.
- Email: Provide a business email address for inquiries.
Add Location and Operating Hours
- Address: If you have a physical location, enter your business address. This is essential for local businesses and for showing up in local searches.
- Map: Facebook will often display a map based on your address, making it easier for customers to find you. Ensure the map pin is accurate.
- Operating Hours: Set your business hours. This lets customers know when you are open and available. You can set different hours for different days of the week and indicate if you are "Permanently Closed," "Temporarily Closed," or "Open with varied hours" if needed.
Flexibility to Update Contact Details Later
You can always go back to the "Page Details" section to update or modify your contact details, address, and operating hours as your business evolves. Keep this information current to maintain accuracy and customer trust.
Step 4: Uploading Visuals and Action Button
Visual elements are critical for making a strong first impression and encouraging engagement.
Choose a Profile Picture
Your profile picture is usually circular and appears in news feeds and search results.
Tips for choosing a profile picture
- Use your logo: For businesses, your logo is typically the best choice for brand recognition.
- High-quality image: Use a clear, high-resolution image that looks good even when scaled down.
- Square format: Profile pictures are displayed in a square format, so ensure your logo or image is well-centered and looks good in this shape.
- Example: A coffee shop might use their company logo, or a public figure might use a professional headshot.
Select a Cover Photo
Your cover photo is a large, horizontal image at the top of your Page. It's prime real estate to showcase your brand's personality and offerings.

Tips for choosing a cover photo
- Visually appealing and relevant: Choose an image that is high-quality, visually engaging, and representative of your brand.
- Showcase your product or service: If applicable, use a photo that highlights what you offer. For example, a restaurant might use a photo of their signature dish.
- Brand imagery: Use branded imagery that aligns with your overall marketing.
- Optimal dimensions: Facebook recommends cover photos be 1640 pixels wide by 856 pixels tall. Ensure your image is correctly sized to avoid distortion.
- Consider mobile view: Cover photos are cropped on mobile devices, so ensure the most important part of your image is centered and visible on smaller screens.
- Example: A travel agency could use a stunning landscape photo, while a tech company might use a modern office setting or product shot.
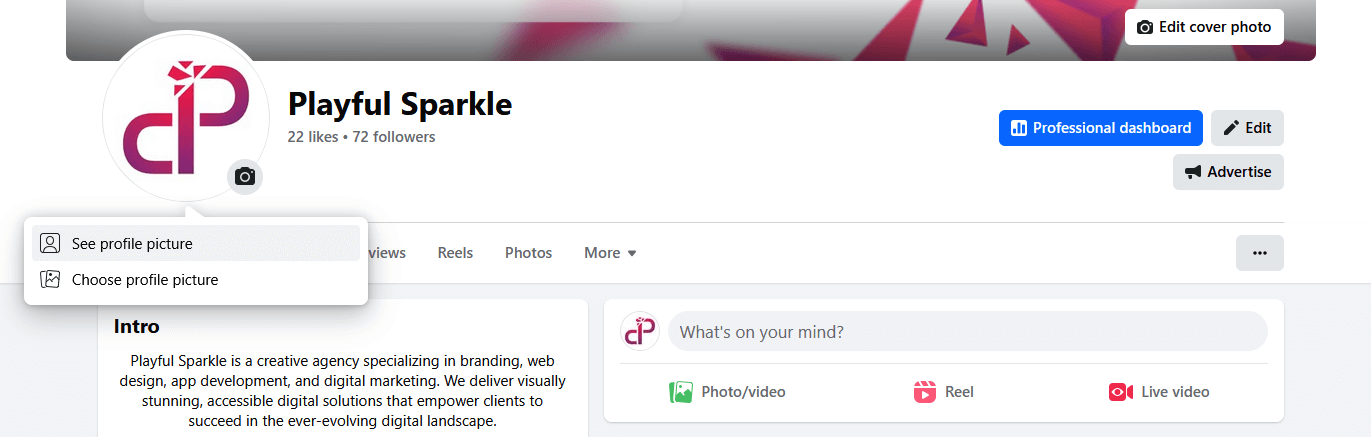
Upload Profile and Cover Photos
Hover over the profile picture area and click "Edit Profile Picture" to upload your profile image.
Similarly, hover over the cover photo area and click "Edit Cover Photo" to upload your cover image.
Add an Action Button
The action button is a prominent button below your cover photo that encourages visitors to take immediate action.
Importance of adding an action button
- Engagement: It drives specific actions you want visitors to take, such as visiting your website, booking an appointment, or contacting you.
- Conversion: It can directly contribute to conversions by making it easy for customers to take the next step.
Instructions for adding an action button
Below your cover photo, you'll typically find a button area. If you haven't added an action button yet, it will prompt you to "Add a Button" or "Edit Action Button" if one exists. Click on this button to customize your action button.
Facebook offers a variety of action button options, categorized by the type of engagement you want to encourage. Choose the option that best aligns with your business goals. Here are the current action button categories and options available:
Help people support you
- Book Now: Connect a scheduling tool to allow people to book appointments directly through your Page.
- Sign Up: Opens a website with a sign-up form, ideal for newsletters, memberships, or registrations.
- Start Order: Opens a website, specifically designed for restaurant businesses to take online orders.
- View Shop: Directs people to your online store, allowing them to browse and find your products.
- Get Tickets: Links to a website where people can purchase tickets for events or venues.
Get people to contact you
- Send Message: Starts a chat with your Page directly in Facebook Messenger.
- Send WhatsApp Message: Initiates a chat with your business through WhatsApp.
- Call Now: Enables visitors to directly call your business phone number.
- Send Email: Opens the user's email client to send an email to your provided business email address.
- Contact Us: Opens a website, typically a contact page or a contact form on your website.
Link to your group or app
- Learn More: Opens a website, generally used to direct visitors to your website's homepage or a specific landing page for more information.
- Watch Now: Opens a website where visitors can watch a video, such as on your website or a video hosting platform.
- Visit Group: Allows you to link to a specific Facebook Group, encouraging visitors to join your community group.
- Play Game: Opens a website where visitors can play a game, often used by gaming businesses or for promotional games.
- Buy Now: Select an online store where people can purchase your products, similar to "View Shop" but potentially for broader e-commerce purposes.
- Reserve: Makes it easy for people to request a reservation, suitable for restaurants, hotels, or service-based businesses that require bookings.
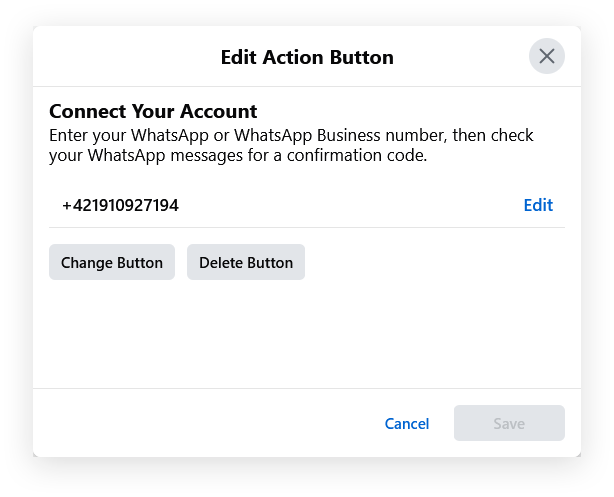
After selecting the most relevant action button, follow the on-screen prompts to configure it. This usually involves linking the button to a specific URL (website, scheduling tool, app, etc.), providing a phone number, or connecting your WhatsApp Business account, depending on the chosen action.
Step 5: Connecting to WhatsApp (Optional)
Integrating WhatsApp with your Facebook Business Page can significantly enhance customer communication.
Benefits of connecting WhatsApp
- Direct and Instant Communication: WhatsApp allows for real-time conversations with customers, providing immediate support and building rapport.
- Customer Convenience: Many customers prefer WhatsApp for quick inquiries and updates.
- Enhanced Customer Service: Respond to questions, provide support, and handle requests efficiently.
- Increased Engagement: Make it easy for customers to reach out, potentially leading to higher engagement and conversions.
Simple steps to add a WhatsApp button
- On your Facebook Business Page, look for the "WhatsApp" section in the left-hand menu (or under "Settings", then "Linked Accounts").
- Click on "Connect WhatsApp" (or similar).
- Enter your business WhatsApp number.
- Facebook will send a verification code to your WhatsApp number. Enter the code to confirm the connection.
- Once connected, you can choose to add a WhatsApp button to your Page, making it easy for visitors to message you via WhatsApp. You can also set up automated greetings and away messages in WhatsApp Business app to manage communications effectively.
Step 6: Inviting Friends to Your Page
Building an initial follower base is crucial for gaining momentum.
Importance of building an initial follower base
- Social Proof: Having followers, even a small initial group, makes your page look more active and credible to new visitors.
- Initial Engagement: Inviting friends can generate initial likes, comments, and shares, boosting your page's visibility in news feeds.
- Early Feedback: Your friends can provide valuable early feedback on your content and page setup.
Tips for inviting Facebook friends
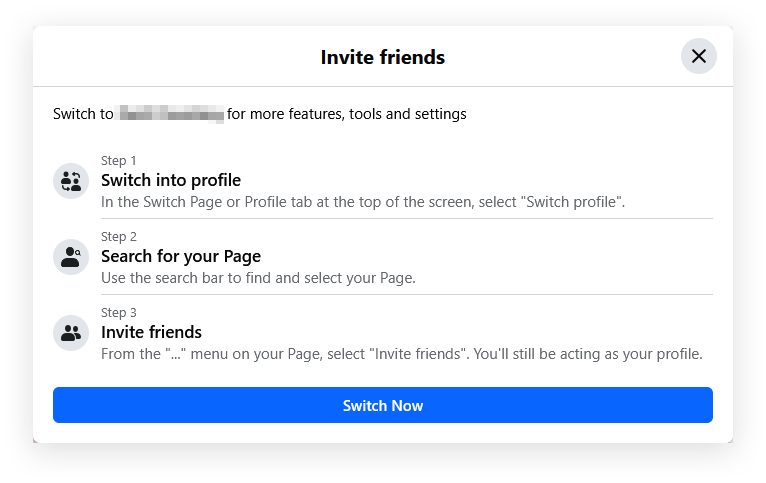
- Use the "Invite Friends" feature: On your Page, look for the "Invite Friends" option (often located in the "..." menu or under "More").
- Select relevant friends: Invite friends who are likely to be genuinely interested in your business or industry. Focus on quality over quantity.
- Personalize invitations (optional): While Facebook's bulk invite feature is convenient, consider sending personalized messages to key contacts to make the invitation more impactful.
- Share on your personal profile: Make a post on your personal profile announcing your new Business Page and encourage your friends to like and follow it.
- Example Invitation Post: "Exciting news! I've launched a Facebook Business Page for [Your Business Name]! I'd love for you to check it out and give it a like to stay updated on our latest offerings and news: [Link to your Facebook Page]. Thanks for your support!"
Step 7: Setting Notification Preferences
Staying informed about page activity is essential for timely engagement and management.
Importance of staying informed about page updates
- Timely Responses: Notifications alert you to new likes, comments, messages, and reviews, enabling you to respond promptly and maintain engagement.
- Community Management: Stay on top of conversations and address any customer service issues quickly.
- Performance Monitoring: Notifications can indirectly help you track page activity and understand what content is resonating with your audience.
Instructions for turning on page notifications
- Go to your Facebook Business Page "Settings" (usually found in the left-hand menu or top right corner).
- Navigate to the "Notifications" section.
- Here, you can customize your notification preferences.
Options to opt in or out of marketing materials
Within the "Notifications" settings, you'll likely find options to control the types of notifications you receive, including:
- Page Activity: Likes, comments, shares, follows, etc.
- Messages: New messages to your Page inbox.
- Reviews: New reviews and recommendations.
- Marketing and Promotional Emails: Facebook may send you emails about page tips, updates, and advertising opportunities. You can usually opt in or out of these marketing emails in the notification settings.
Customize to your needs: Adjust the notification settings to receive alerts for the types of activities that are most important for you to monitor and respond to. You can choose to receive notifications via Facebook, email, or push notifications to your mobile device.
Step 8: Posting Content
Content is the heart of your Facebook Business Page. Regular, engaging posts keep your audience interested and coming back for more.
Different types of content you can post
- Text Updates: Short, engaging text posts sharing news, updates, tips, or questions.
- Photos: Visually appealing images related to your business, products, team, or events.
- Videos: Video content is highly engaging. Share product demos, behind-the-scenes glimpses, customer testimonials, or live videos.
- Links: Share links to your blog posts, website pages, news articles, or other relevant content.
- Events: Promote upcoming events, workshops, webinars, or sales.
- Polls and Questions: Interactive posts to engage your audience and gather feedback.
- Stories: Ephemeral content (visible for 24 hours) for quick updates, behind-the-scenes, and informal content.
- Reels: Short-form, entertaining videos similar to TikTok, ideal for grabbing attention and showcasing creativity.
- Live Videos: Engage with your audience in real-time for Q&As, announcements, or live events.
Importance of regularly posting engaging content
- Maintain Visibility: Consistent posting keeps your page active in followers' news feeds.
- Audience Engagement: Engaging content encourages likes, comments, shares, and interactions, building a community.
- Brand Building: Regular posting reinforces your brand identity and messaging.
- Drive Traffic: Content can drive traffic to your website or physical store.
- Improve Facebook Algorithm Ranking: Pages with active and engaging content are favored by Facebook's algorithm, increasing organic reach.
Suggestions for initial posts and ideas
- Welcome Post: Introduce your new page and your business. Clearly state what your page will be about and what value followers can expect.
- "About Us" Post: Share your brand story, mission, and values.
- Product or Service Showcase: Highlight your key products or services with appealing visuals and descriptions.
- Behind-the-Scenes: Give followers a glimpse into your business operations, team, or workspace to humanize your brand.
- Ask a Question: Pose a question related to your industry or audience interests to spark conversation.
- Share a Relevant Article or Tip: Provide valuable content related to your niche to establish yourself as a knowledgeable resource.
- Run a Contest or Giveaway: Generate excitement and encourage page follows by running a simple contest or giveaway.
How to Add Team Members
You can grant different levels of access to people helping manage your Facebook Page: Facebook Access and Task Access. If your Page is part of a business portfolio, access levels may differ.
Facebook Access
Allows users to manage the Page directly on Facebook or through Facebook's business tools. There are two levels:

Full Control
Provides complete administrative rights, including:
- All content management (posts, stories, etc.)
- Messaging and comment management
- Linked accounts management (e.g., Instagram)
- Ad creation and management
- Insights access
- Event management
- User removal and bans
- Settings Management: Full control over Page settings and deletion.
- Access Management: Ability to grant/revoke Facebook and task access, including full control, to others. Grant with caution as full control users have the same power as you.
Partial Control
Offers extensive management capabilities, excluding Settings and Access Management. Permissions include:
- All content management (posts, stories, etc.)
- Messaging and comment management
- Linked accounts management (e.g., Instagram)
- Ad creation and management
- Insights access
- Event management
- User removal and bans
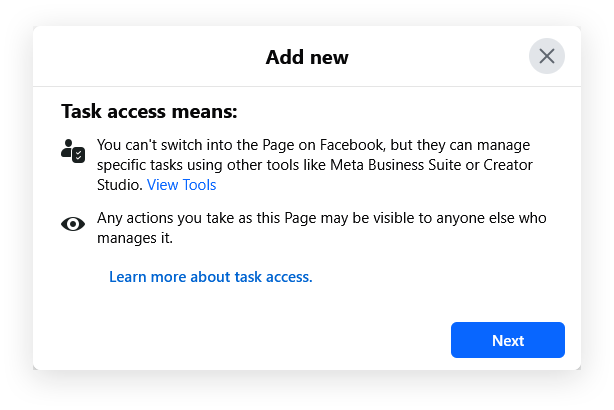
Task Access
Allows users to manage the Page using tools like Meta Business Suite, Creator Studio, or Ads Manager, but not directly on Facebook itself. Permissions are task-specific:
- Content management (posts, Stories, etc.)
- Messaging and community activity moderation
- Ad creation and management
- Insights access
Community Manager Access
Specifically for moderating live stream chats. Limited to:
- Moderate Live Chat:
- Deleting or reporting comments.
- Suspending users (15 min).
- Banning users from current or all live streams.
- Pinning comments.
How to Delete or Deactivate Your Page
There might be situations where you need to temporarily deactivate or permanently delete your Facebook Business Page. It's important to understand the updated process for both options.
Steps to Temporarily Deactivate or Permanently Delete Your Page
- Go to your Facebook Business Page "Settings".
- Navigate to "Access and Control" in the left-hand menu.
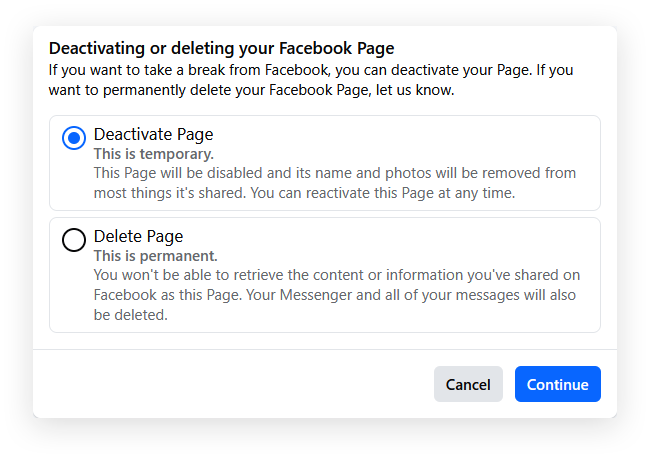
- In the "Deactivation and deletion" section, you will see options to either "Deactivate Page" or "Permanently Delete Page".
- Choose your desired option:
- Deactivate Page: Select this for temporary deactivation. Your page will be hidden from public view, but all data will be preserved for reactivation.
- Permanently Delete Page: Select this for permanent deletion. This action is irreversible, and you will lose all content, followers, and insights.
- Follow the prompts to confirm your selection. Facebook will guide you through the final steps for either deactivation or deletion.
Considerations Before Deleting a Page
- Permanent Deletion is Irreversible: Understand that deleting your page is a permanent action. All content, followers, and analytics data will be lost and cannot be recovered.
- Deactivation for Temporary Breaks: If you are considering deletion but are unsure, deactivation is a safer first step. It allows you to temporarily hide your page while retaining all your data should you decide to reactivate in the future.
- Inform Your Audience (If Necessary): If your page has an active community, it's good practice to create a final post before deactivation or deletion to inform your followers about the page's status and direct them to other online channels (website, other social media profiles, etc.), if applicable.
Importance of Backing Up Information Before Deletion
Before permanently deleting your Facebook Page, it's crucial to download a backup of your page data. Facebook provides a tool to easily preserve your valuable content.

- Access Download Settings: Go to your Facebook Business Page Settings, then navigate to "Download your information" in the left menu.
- Choose Download Options: Customize your backup in the "Download Your Information" section:
- Format: Select HTML (easy viewing) or JSON (for data import). HTML is recommended for most users.
- Media Quality: Choose High, Medium, or Low. Higher quality increases file size.
- Date Range: Specify the data period using the Date range dropdown ("All time" or custom).
- Select Data to Download: Choose what information to include:
- Everything: Download all Page data.
- Select information types: Choose specific categories like:
- Page activity (posts, photos, groups, etc.)
- Profile information
- Connections
- Logged information
- Start Download & Secure File: Click "Start your download". Facebook will prepare an archive. Once notified, download it and store it securely, as it contains private Page data.
Downloading a backup ensures you retain your Page content for record-keeping, archiving, future repurposing, or in case you decide to recreate your Page later.
Conclusion
In conclusion, establishing a robust Facebook Business Page in 2025 is a pivotal step for any business aiming to enhance its online presence, foster meaningful customer engagement, and drive significant brand growth. Leverage the power of this essential digital marketing tool to connect with your audience and achieve your business objectives.
Questions
A Facebook Business Page allows businesses, organizations, and public figures to connect with a vast audience, build customer loyalty, and drive growth by leveraging Facebook's large user base.
A Facebook Profile represents an individual for personal connections, while a Facebook Page represents a business, brand, or organization for public communication and marketing.
Yes, Facebook requires you to log in to a personal Facebook profile to create and manage a Business Page for administrative and security purposes.
No, your personal profile information will not be publicly visible on your Business Page. Facebook keeps these separate.
Use your business name if possible, keep it concise and memorable, consider relevant keywords for SEO, and check for name availability.
Your bio should be concise (around 100-155 characters), highlight your key offerings, use relevant keywords, and optionally include a call to action.
Providing contact information like phone number, website, and email is essential for customer connection and building trust.
Typically, your business logo is the best choice for your profile picture to ensure brand recognition.
The action button encourages visitors to take immediate action, such as visiting your website, booking an appointment, or contacting you.
Examples include "Book Now," "Sign Up," "Send Message," "Call Now," "Learn More," and "Visit Group."
Connecting WhatsApp allows for direct and instant communication with customers, enhancing customer service and engagement.
e.
Staying informed about page activity allows you to respond promptly to messages, comments, and reviews, helping you manage your community effectively.
You can post text updates, photos, videos, links, events, polls, questions, Stories, Reels, and Live Videos.
Consistent posting maintains visibility, encourages audience engagement, builds your brand, drives traffic, and improves your page's ranking in Facebook's algorithm.
Consider a welcome post, an "About Us" post, showcasing products or services, sharing behind-the-scenes content, asking a question, or running a contest.

Article author Zsolt Oroszlány
CEO of the creative agency Playful Sparkle, brings over 20 years of expertise in graphic design and programming. He leads innovative projects and spends his free time working out, watching movies, and experimenting with new CSS features. Zsolt's dedication to his work and hobbies drives his success in the creative industry.
Let’s amplify your success together!
Request a Free QuoteRelated articles

The Complete Social Media Image Sizes Cheat Sheet
In today's digital world, visuals are key for getting your message across on social media. No matter if you're a new brand, a marketing expert, or just someone sharing their passions, what you post visually is super important. Read moreabout The Complete Social Media Image Sizes Cheat Sheet

How to Manage Multiple Social Media Accounts Like an Expert?
With platforms like Facebook (opens in new window), Instagram (opens in new window), Twitter (opens in new window), LinkedIn (opens in new window), TikTok (opens in new window), and Pinterest (opens in new window) offering unique opportunities to reach audiences, businesses are expected to maintain a strong and active online presence. Read moreabout How to Manage Multiple Social Media Accounts Like an Expert?
What are Tracking Pixels and How Do They Work?
Tracking Pixels are crucial components in the realm of digital marketing, serving as small snippets of code that enable marketers and web developers to monitor user behavior, evaluate campaign performance, and enhance conversion rates. Read moreabout What are Tracking Pixels and How Do They Work?