Step-by-Step Guide to Building Your First Python Package
Creating a Python module requires more than just writing code. Modern development demands proper tooling, standardized workflows, and automation. In this guide, we’ll walk through setting up a robust Python project, complete with testing, linting, CI/CD pipelines, and PyPI publishing. Whether you’re developing a utility library or a full-scale application, these practices will streamline your workflow and ensure maintainability.
TL;DR
This article guides Python developers in creating professional modules by covering essential steps like setting up their project structure with key files, automating development tasks, writing unit tests using pytest, and securely publishing their package to PyPI via GitHub Actions. By following these best practices, developers can build robust and shareable Python libraries/modules.
Setting Up Your Development Environment
Before diving into module creation, ensure you have Python installed on your development machine. Here's a quick guide for the major operating systems:
- Navigate to the official Python website: https://www.python.org/downloads/ (opens in new window)
- Download the latest stable version of Python 3.13.3.
Windows
Run the installer, making sure to check the Add Python to PATH option during installation. This will allow you to execute Python commands from your command prompt. After installation verify your installation with python --version in PowerShell/CMD.
Install Chocolatey
Chocolatey simplifies Python development setup on Windows by providing a convenient way to install essential development tools.
To install Chocolatey, open PowerShell as administrator and execute the provided installation command.
Set-ExecutionPolicy Bypass -Scope Process -Force; iex ((New-Object System.Net.WebClient).DownloadString('http://internal/odata/repo/ChocolateyInstall.ps1'))Install Make on Windows
We install make using Chocolatey for easy, automated installation and management of the make utility on Windows.
choco install makeLinux
Debian/Ubuntu
sudo apt update
sudo apt install python3 python3-pip
Fedora/CentOS/RHEL
sudo dnf install python3 python3-pipArch Linux
sudo pacman -S python python-pipmacOS
macOS comes with Python pre-installed, but it's often an older version. It's recommended to install a more recent version using the official installer or a package manager like Homebrew:
Using the official installer: Go to https://www.python.org/downloads/macos/ (opens in new window) and download the latest stable version. Run the installer.
Using Homebrew (if you have it installed)
brew update
brew install python@3
You might need to adjust your PATH to prioritize the Homebrew-installed Python.
Essential Development Tools
Install these globally or in a virtual environment:
pip install setuptools wheel flake8 pytest black pylintKey Packages for Module Development
To create a professional Python module, you'll rely on several essential packages:
setuptools: This is a widely used library for packaging Python projects. It provides the necessary tools to define your package and its metadata. You've already specified it as your build backend inpyproject.toml.pytest: A powerful and flexible testing framework for Python. It simplifies writing and running tests. YourMakefilealready utilizespytest.typing-extensions: This package provides backports of new type hints for older Python versions. Yourpyproject.tomlcorrectly includes it as a conditional dependency.flake8: A wrapper around PyFlakes, pycodestyle, and McCabe, used for linting your code and ensuring it adheres to Python style conventions (PEP 8). YourMakefileusesflake8for linting.black: An opinionated code formatter that automatically formats your code to a consistent style. While not strictly required, it significantly improves code readability and reduces stylistic debates. YourMakefileincludes a command to format withblack.pytest-cov: Apytestplugin for measuring code coverage. YourMakefileuses it to generate coverage reports.
Project Folder Structure
A well-defined project structure is crucial for maintainability and collaboration. Here's a common and recommended structure for a Python module:
    your_module_name/
      .github/
      └── workflows/
          ├── python-publish.yml
          └── tests.yml
      src/
      └── your_module_name/
          ├── __init__.py
          ├── core.py
      tests/
          ├── __init__.py
          ├── requirements.txt
          └── test_your_module_name.py
      .gitattributes
      .gitignore
      CHANGELOG.md
      LICENSE
      Makefile
      pyproject.toml
      README.md
      requirements.txt
      setup.py
Let's break down each component
.github/
- Purpose: This directory is specific to GitHub and is used to configure various GitHub features for your repository.
- Significance for Python Module Development: It's common to use GitHub for hosting your module's source code, tracking issues, and managing contributions.
.github/workflows/
- Purpose: This subdirectory within .github/ contains YAML files that define automated workflows. These workflows are triggered by events in your GitHub repository (e.g., pushing code, opening pull requests).
- Significance for Python Module Development: This is where you define your Continuous Integration/Continuous Deployment (CI/CD) pipelines.
- python-publish.yml: This workflow likely automates the process of publishing your Python module to a package index like PyPI (Python Package Index) when you create a new release (e.g., tag a commit). It might involve building the package, running tests, and then uploading it to PyPI.
- tests.yml: This workflow is typically configured to automatically run your tests whenever code is pushed to the repository or a pull request is opened. This ensures that your code changes haven't introduced any regressions. It might also include linting and formatting checks.
src/
- Purpose: This directory is the standard location for your module's actual source code.
- Significance for Python Module Development: It clearly separates your module's logic from other project files like tests and documentation.
src/your_module_name/
- Purpose: This subdirectory, named after your module, is the actual Python package.
- Significance for Python Module Development: This structure allows for cleaner imports within your project and when users install your module.
- __init__.py: This file makes the your_module_name directory a Python package. It can be empty or can contain code to initialize the package or expose specific modules or functions at the top level.
- core.py: This is an example of a Python file containing the core logic of your module. You might have multiple .py files here, each responsible for different aspects of your module's functionality.
tests/
- Purpose: This directory houses your unit tests.
- Significance for Python Module Development: Writing comprehensive tests is crucial for ensuring the reliability and correctness of your module.
- __init__.py: Similar to the src directory, this file makes the tests directory a Python package, although it's less commonly used for initialization in test suites.
- test_your_module_name.py: This is an example of a test file. It contains the actual test functions that verify the behavior of the code in your src/your_module_name/ directory. You would typically have multiple test files covering different parts of your module.
- requirements.txt (within tests/): This file lists the specific Python packages required to run your tests. These might include testing frameworks like pytest, coverage tools like pytest-cov, and any other dependencies needed only for testing purposes. This is separate from the main project's requirements.txt.
.gitattributes
- Purpose: This file tells Git how to handle line endings and other file attributes for your repository.
- Significance for Python Module Development: It helps ensure consistency across different operating systems (Windows, Linux, macOS) where line endings are handled differently. A common entry is text=auto eol=lf to enforce LF (Line Feed) line endings.
.gitignore
- Purpose: This file specifies intentionally untracked files that Git should ignore.
- Significance for Python Module Development: It prevents temporary files, build artifacts, environment-specific configurations (like virtual environment folders), and other unnecessary files from being committed to your repository.
CHANGELOG.md
- Purpose: This file keeps a record of changes made in each version of your module.
- Significance for Python Module Development: It's essential for users to understand what's new, improved, or fixed in each release. Following a standard like Keep a Changelog is recommended.
LICENSE
- Purpose: This file contains the license under which your module is distributed.
- Significance for Python Module Development: Choosing an open-source license clearly defines the terms of use, modification, and distribution of your module for others.
Makefile
- Purpose: This file automates common development tasks using the make utility.
- Significance for Python Module Development: As discussed in the previous article, it provides a convenient way to run tests, lint code, format code, build the package, and perform other repetitive tasks with simple commands.
pyproject.toml
- Purpose: This file specifies build system requirements for Python projects, as defined by PEP 518.
- Significance for Python Module Development: It's the modern standard for managing project metadata, build dependencies, and optional dependencies. It replaces the need for a standalone setup.py in many cases when used with a build backend like setuptools.
README.md
- Purpose: This file provides an overview of your module, including its purpose, installation instructions, usage examples, and any other relevant information.
- Significance for Python Module Development: It's the first point of contact for users and contributors, providing essential information about your module.
requirements.txt (at the root level)
- Purpose: This file lists the runtime dependencies of your Python module.
- Significance for Python Module Development: When users install your module using pip install your_module_name, pip will use this file to install the necessary dependencies. While pyproject.toml is the modern approach for declaring dependencies, requirements.txt is still commonly used, especially for specifying exact versions for reproducibility. You might generate this from your development environment or maintain it alongside your pyproject.toml.
setup.py
- Purpose: Historically, this file was used to define how your module should be installed and distributed using setuptools.
- Significance for Python Module Development: While pyproject.toml is the recommended modern approach, setup.py is still present in many projects, especially those that haven't fully migrated. It often works in conjunction with pyproject.toml when setuptools is specified as the build backend.
This detailed breakdown should give you a clear understanding of the purpose and significance of each component in this well-structured Python module project. This structure promotes organization, maintainability, and collaboration.
Automating Tasks with Makefile
A Makefile is a file used by the make utility, a command-line tool that automates build processes. In software development, it's common to have a series of tasks that need to be executed repeatedly, such as running tests, linting code, formatting, building documentation, or installing the software. A Makefile defines these tasks as "targets" and specifies the commands needed to execute each target. This provides several benefits:
- Automation: It automates repetitive tasks, saving developers time and reducing the chance of errors.
- Consistency: It ensures that these tasks are performed in a consistent manner every time.
- Efficiency:
makeis intelligent enough to only re-execute tasks when their dependencies have changed, making the process more efficient. - Documentation: The
Makefileitself serves as a form of documentation, outlining the common development commands for the project.
Example Makefile
.PHONY: test lint format install uninstall coverage help

# Default target when just running 'make'
help:
    @echo "Available commands:"
    @echo "  make test         - Run all tests"
    @echo "  make lint         - Run linting checks"
    @echo "  make format       - Format code with Black (if installed)"
    @echo "  make coverage     - Generate test coverage report"
    @echo "  make install      - Install the package"
    @echo "  make uninstall    - Uninstall the package"
    @echo "  make check        - Run both lint and test"

test:
    pytest tests/

lint:
    flake8 src/ tests/

format:
    black src/ tests/ || echo "Black not installed. Run 'pip install black' to enable formatting."

coverage:
    pytest --cov=<your_module_name> tests/ --cov-report=term --cov-report=html
    @echo "HTML coverage report generated in htmlcov/"

install:
    pip install .

uninstall:
    pip uninstall -y <your_module_name>

check: lint test
Explanation of the Commands
.PHONY: test lint format install uninstall coverage help: This line declares that the listed targets are not actual files but commands to be executed.help: This is the default target. Runningmakewithout any arguments will execute this command, displaying a helpful list of available commands.test: Runs your unit tests usingpytest.lint: Performs static code analysis usingflake8to identify potential style issues and errors.format: Automatically formats your code to adhere to a consistent style usingblack. The|| echo ...part ensures that ifblackis not installed, the command doesn't fail but instead prints a helpful message.coverage: Runs tests with coverage analysis usingpytest-cov. It generates both a terminal report and an HTML report in thehtmlcov/directory, showing which parts of your code are covered by tests.install: Installs your module usingpip. The.refers to the current directory, wheresetup.py(orpyproject.tomlwith build instructions) is located.uninstall: Uninstalls your module usingpip. The-yflag automatically confirms the uninstallation.check: Runs both thelintandtestcommands sequentially, ensuring your code is both stylistically correct and passes all tests.
To use this Makefile, you'll need the make utility installed on your system. It's usually available by default on Linux and macOS. For Windows, you might need to install a build tools package.
Managing Project Metadata with pyproject.toml
The pyproject.toml file is the modern standard for specifying build system requirements and project metadata for Python projects, as defined in PEP 518. It serves as a central configuration file that tells build tools like pip and build how to build your project and what dependencies it has. This offers several advantages:
- Standardization: It provides a standardized way to configure Python projects, making it easier for different tools to understand and work with them.
- Dependency Management: It allows you to declare both build-time and runtime dependencies in a single file.
- Build Backend Specification: It specifies which build backend (e.g.,
setuptools,poetry-core) should be used to build your project. - Metadata Storage: It centralizes project metadata like name, version, authors, license, and more.
- Extensibility: It supports additional configuration sections for various tools, like linters and formatters.
Example pyproject.toml Content
[project]
authors = [
    {name = "your_name", email = "your_email"},
]
classifiers = [
    "Development Status :: 5 - Production/Stable",
    "Intended Audience :: Developers",
    "Intended Audience :: Information Technology",
    "Natural Language :: English",
    "Operating System :: OS Independent",
    "Programming Language :: Python :: 3",
    "Programming Language :: Python :: 3.10",
    "Programming Language :: Python :: 3.12",
    "Programming Language :: Python :: 3.13",
    "Topic :: Software Development :: Libraries",
    "Topic :: Software Development :: Libraries :: Python Modules",
    "Topic :: Text Processing :: General",
    "Typing :: Typed",
    "Framework :: Pytest",
]
dependencies = [
    "typing-extensions>=4.0.0; python_version<'3.11'",
]
description = "<your_project_description>"
keywords = []
license = {text = "<your_license>"}
maintainers = [
    {name = "your_name", email = "your_email"},
]
name = "<your_module_name>"
readme = "README.md"
requires-python = ">=3.10"
version = "1.0.0"

[project.urls]
"Bug Tracker" = "https://github.com/.../<your_module_name>/issues"
"Change Log" = "https://github.com/.../<your_module_name>/blob/main/CHANGELOG.md"
"Github" = "https://github.com/.../<your_module_name>"
"Homepage" = "https://github.com/.../<your_module_name>"

[build-system]
build-backend = "setuptools.build_meta"
requires = ["setuptools>=65.0.0", "wheel"]

[project.optional-dependencies]
test = [
    "pytest>=8.3.0",
    "pytest-cov>=4.1.0",
    "flake8>=7.0.0",
]
Explanation of Key Sections
[project]: Contains core project metadata like name, version, authors, description, license, dependencies, and more.[project.urls]: Provides links to relevant project resources.[build-system]: Specifies the build backend and its requirements.[project.optional-dependencies]: Defines optional dependencies, often used for development or testing.
By using pyproject.toml, you adopt a more modern and standardized approach to managing your Python project's configuration.
Writing Robust Code with Unit Tests using pytest
Creating a reliable Python module requires rigorous testing. Unit tests focus on verifying the functionality of individual components of your code, ensuring they behave as expected under various conditions. pytest is a popular and powerful testing framework that simplifies the process of writing and running unit tests in Python.
Let's look at a practical example using pytest based on your provided test code:
import pytest

class TestMyModuleFunction:
    def test_should_return_five(self):
        assert my_add_function(2, 3) == 5
Running Your Tests
To run these tests using pytest, you would typically navigate to the root directory of your project in your terminal and execute the command:
make testAs defined in your Makefile, this command will instruct pytest to discover and run all test files (usually named starting with test_ and located in the tests directory). pytest will then provide a summary of the test results, indicating which tests passed and which failed.
Benefits of Unit Testing
- Early Bug Detection: Writing tests helps you identify and fix bugs early in the development process, before they become more complex and harder to track down.
- Code Confidence: A comprehensive suite of unit tests gives you confidence that your code is working correctly and that changes you make in the future won't introduce regressions.
- Living Documentation: Your tests serve as a form of documentation, illustrating how different parts of your module are intended to be used.
- Improved Design: The process of writing tests often forces you to think more carefully about the design of your code, leading to more modular and testable components.
By incorporating unit testing with pytest into your Python module development workflow, you can significantly improve the quality and reliability of your code. Remember to write tests for various scenarios, including normal cases, edge cases, and potential error conditions.
Publishing Your Python Package to PyPi
Once you've crafted a well-structured and thoroughly tested Python module, the next logical step is to share it with the wider Python community by publishing it to the Python Package Index (PyPI). This allows other developers to easily install and use your module in their projects. Here's how you can make your package available on PyPI:
Before you embark on the publishing process, ensure your local environment is in good shape:
- Format Your Code: Run make format to ensure your code adheres to consistent style guidelines.
- Lint Your Code: Execute make lint to catch any potential stylistic issues or errors.
- Run Unit Tests: Verify the functionality of your module by running make test. All tests should pass before proceeding.
- Push Changes to GitHub: Commit all your changes and push them to your remote GitHub repository.
Prepare for publishing on PyPI
Register on PyPI: If you haven't already, create an account on the official PyPI website: https://pypi.org (opens in new window)
Setting Up API Token Authentication
To use API tokens for publishing from your GitHub Actions workflow, you'll need to create an API token on PyPI and securely store it as a secret in your GitHub repository:
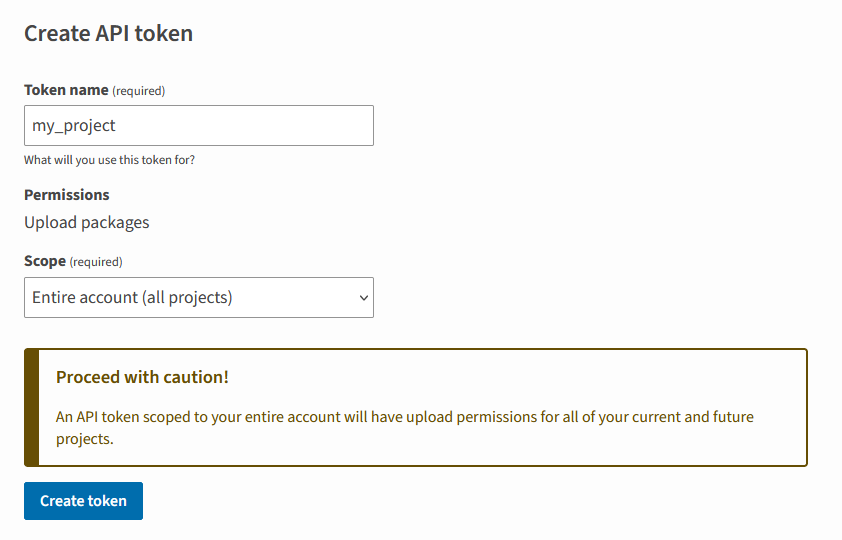
Generate an API Token on PyPI
- Log in to your PyPI account on https://pypi.org (opens in new window).
- Navigate to your account settings https://pypi.org/manage/account (opens in new window).
- Look for the API tokens section.
- Click on Add API token.
- Fill out Token name.
- Choose the scope for the token. For publishing, you'll typically select the scope for your specific project or "Entire account" if you plan to publish multiple packages.
- Click "Create token".
Important: Copy the generated token and store it in a secure place immediately. You won't be able to see it again.
Add the API Token as a GitHub Repository Secret
- Go to your GitHub repository for your Python module.
- Navigate to Settings at the top of the page.
- In the left sidebar, click on Secrets and variables and then Actions.
- Click on the Repository secrets section.
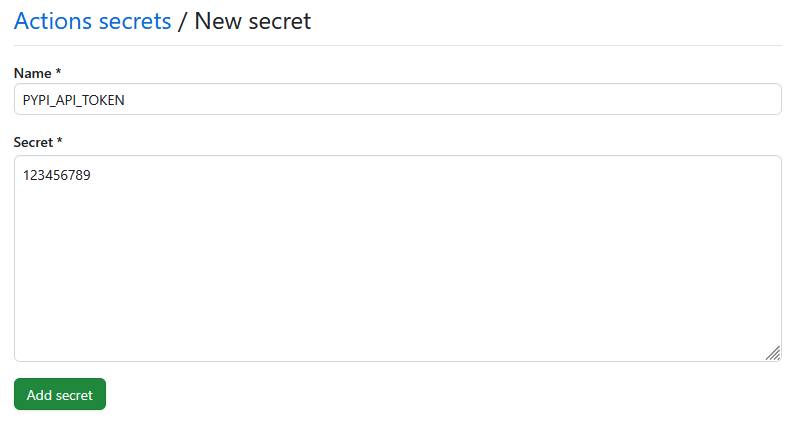
- Click the green New repository secret button.
- For the Name, enter
PYPI_API_TOKEN. - For the Secret, paste the API token you copied from PyPI.
- Click the green Add secret button.
Now that you've stored your PyPI API token as a secret in your GitHub repository, your GitHub Actions workflow can use it to authenticate with PyPI during the package upload process. You'll need to ensure your python-publish.yml workflow is configured to use this secret for authentication instead of relying solely on the trusted publisher setup (or as an alternative method).
Setup package publishing on PyPi
You need to configure this in your PyPI account:
- Log in to your PyPI account on https://pypi.org (opens in new window).
- Navigate to your Trusted Publisher Management settings https://pypi.org/manage/account/publishing (opens in new window).
- Find the Add a new pending publisher section.
- Fill out the form with your project's details and submit it. This links your PyPI project with your GitHub repository and the specified workflow.

- PyPI Project Name (required):
your_module_name(This should match the name field in your pyproject.toml). - Owner (required): Your GitHub organization name or your GitHub username that owns the repository.
- Repository name (required): The name of your GitHub repository (e.g.,
your_module_name). - Workflow name (required):
python-publish.yml(This is the filename of your publishing workflow in your GitHub repository's.github/workflows/directory). - Environment name (optional): You can specify a GitHub Actions environment name here if you have configured one for publishing in your repository settings. Using a dedicated publishing environment is highly recommended for enhanced security.
- PyPI Project Name (required):
Final steps to release your Python module
With the PyPI and GitHub setup complete, the subsequent publishing process is automated via GitHub Actions. To initiate a release:
- Push Your Project to GitHub: Ensure all local changes are committed and pushed to your remote GitHub repository.
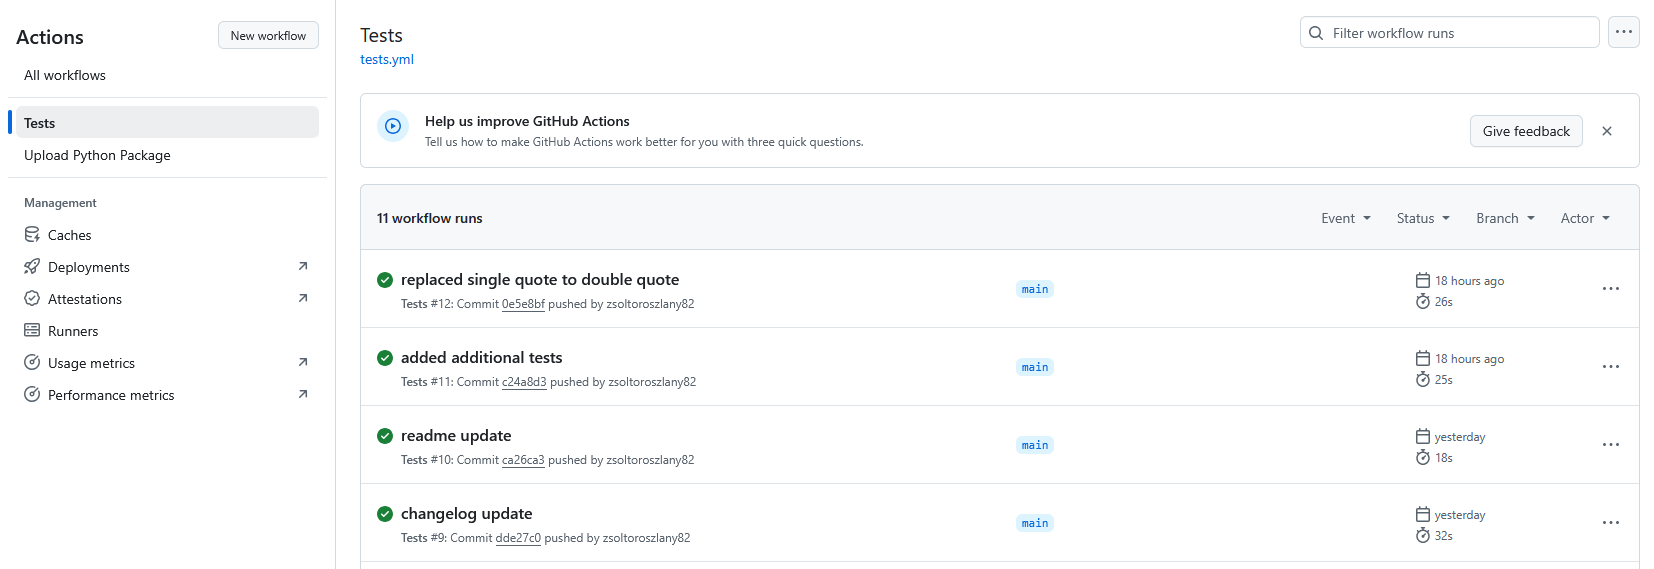
- Create a New Release: On your GitHub repository, create a new release. This action serves as the trigger for your configured GitHub Actions workflow (e.g.,
python-publish.yml).
Upon the creation of a new release, GitHub Actions will automatically execute the publishing workflow. This workflow will typically perform tasks such as building your package and, if all defined checks (including tests) pass and the pyproject.toml is successfully verified with PyPI, it will proceed to upload the newly created release of your package to PyPI.
Once the GitHub Actions workflow successfully completes, your Python package will be publicly accessible on PyPI. Developers can then install it using the standard pip command:
pip install your_module_nameYou can find your published package on PyPI at the following URL: https://pypi.org/project/your_module_name/ (replace your_module_name with the actual name of your module).
Best Practices
- Versioning: Use semantic versioning in
pyproject.toml. - Documentation: Keep
README.mdandCHANGELOG.mdupdated. - Testing: Run
make check (lint + test)before commits.
Conclusion
Creating a professional Python module involves more than just writing code. By following a well-defined project structure, automating tasks with tools like make, managing metadata with pyproject.toml, and utilizing essential development packages, you can build robust, maintainable, and easily shareable Python modules that will benefit both your own projects and the wider Python community. Embrace these practices, and you'll level up your Python development skills and create a lasting impact with your code.
Questions
A well-defined project structure improves organization, maintainability, and clarity. Separating source code into src/ prevents import issues and makes it easier to package, while a dedicated tests/ folder keeps test code separate from the main logic.
The Makefile automates common development tasks like running tests, linting, formatting, installing, and uninstalling the package, saving time and ensuring consistency across the project.
pyproject.toml is the modern standard for project metadata and build system configuration. It often replaces setup.py. requirements.txt primarily lists runtime dependencies, while pyproject.toml can also specify build dependencies.
Unit tests verify the functionality of individual parts of your code, helping to catch bugs early, increase code confidence, serve as documentation, and improve the overall design of your module.
Using a testing framework like pytest, you can usually run tests by navigating to the project root in your terminal and executing a command like make test (if a Makefile is configured) or directly using pytest tests/.
The article outlines two main methods: using PyPI's trusted publisher mechanism with GitHub Actions and using PyPI API tokens for authentication within a GitHub Actions workflow.
A PyPI API token (opens in new window) is a secure alternative to using your password for uploading packages. It offers more granular control and can be revoked if compromised, enhancing the security of your PyPI account.
By using GitHub Actions (opens in new window), you can create a workflow that automatically builds, tests, and publishes your package to PyPI whenever you create a new release in your GitHub repository. This streamlines the release process significantly.

Article author Zsolt Oroszlány
CEO of the creative agency Playful Sparkle, brings over 20 years of expertise in graphic design and programming. He leads innovative projects and spends his free time working out, watching movies, and experimenting with new CSS features. Zsolt's dedication to his work and hobbies drives his success in the creative industry.
Let’s amplify your success together!
Request a Free QuoteRelated articles
What is Google Consent Mode V2? How to Implement It?
As privacy regulations like the General Data Protection Regulation (GDPR) and the California Consumer Privacy Act (CCPA) have fundamentally shifted how businesses approach user data, Google Consent Mode V2 emerges as a vital tool. Read moreabout What is Google Consent Mode V2? How to Implement It?

The Ultimate Guide to Brand Consistency
Brand consistency is an essential element for any successful company. It's not just about creating a recognizable logo or a catchy slogan—brand consistency is about ensuring that every interaction a customer has with your brand aligns with your core values and visual identity. Read moreabout The Ultimate Guide to Brand Consistency

What is a CAPTCHA? A comprehensive guide
In the evolving landscape of internet security, one persistent challenge is the prevention of automated abuse. CAPTCHA (Completely Automated Public Turing test to tell Computers and Humans Apart) was designed to combat this very issue, distinguishing between human users and malicious bots by presenting challenges that are easy for humans but difficult for machines. Read moreabout What is a CAPTCHA? A comprehensive guide